Fax broadcast via self service
- An online account with GoFax
- Purchased GoFax Send credits
List washing against the Do Not Call Register
GoFax provides a free optional 'DNCR Washing' facility. When activated, this will prevent your account from sending faxes to fax numbers on the DNCR register. We recommend that you use this facility with any fax marketing sent to Australian numbers that have not opted in to receive communication from you (e.g. unsolicited marketing faxes).
- on your account under your " General Send Settings ", ticking the option "Always use Do Not Call Registry when sending faxes". When activated, this will 'wash' all faxes sent across your account or
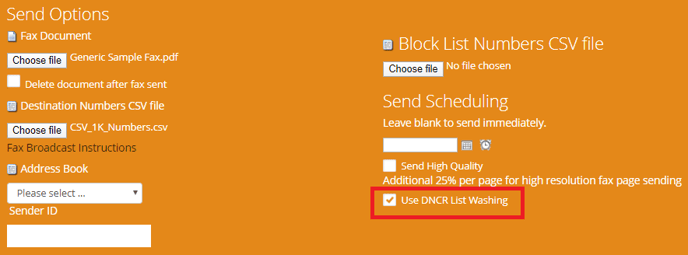
- for individual fax broadcasts by ticking "Use DNCR List Washing" on the "Broadcast Fax (CSV Upload)" page.
Adding the recipient’s fax number to the fax header
Another included feature of GoFax is the ability to "add the recipient’s fax number to the fax header". When sending marketing faxes in Australia, it is a legal requirement under the Fax Marketing Industry Standard 2011 to include the destination number that the fax is intended to be sent to.
- Log in to your GoFax secure web portal
- Go to the left main menu "Dashboard"
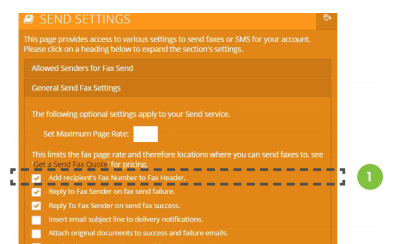
- Go to "Send Fax Service", then "Manage Send Settings", select "General Send Fax Settings" and ensure "Add recipient’s Fax Number to Fax Header" is ticked.
- Select "Save Changes".
Preparing your fax broadcast
1 . Ensure you have enough send credits for the broadcast.
2. Format your destination fax list and block number lists.
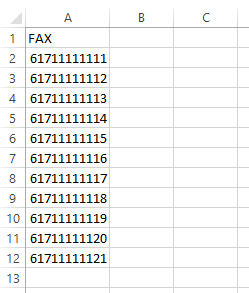
- Include the fax numbers in the first column only, with "fax" as the first line.
- Include the numbers in international format - e.g. if you are sending to 1234 5678 in Sydney (02), Australia, include the number as 61212345678
- Do not include any special characters in your list document and avoid commas etc.
If you’re experiencing difficulty getting your fax numbers into the required international format, using Microsoft Excel various short cuts are available. You may notice that, once you remove all special characters and spaces from an Australian number, Excel will automatically convert it to a standard number format and strip the leading zero (so 02 1234 5678 becomes 212345678). Once it has done so:
- Select the cells containing the numbers.
- Right click and select "Format Cells" from the menu.
- Select the "Custom" category in the "Number" tab.
- Enter “61000000000” (nine zeroes) in the "Type:" field.
3. Uploading and scheduling
- Log in to your GoFax secure web portal.
- Go to the main menu ( The Dashboard ).
- Go to "Send Fax Service", then "Broadcast Fax (CSV upload)". The Bulk Faxes page will appear.
- Under "Send Options", "Fax Document", select " Choose File" to upload your Fax Document.
- Upload your "Destination Numbers CSV file" . This is your fax database formatted and saved as a Excel CSV- see instructions above.
- If required, upload your "Block List Numbers CSV file". This is your fax unsubscribers formatted and saved as a Excel CSV- see instructions above.
- Send Scheduling: Set the required date and time for commencement of your broadcast (leave blank if you wish to send the campaign immediately).
- Send High Quality: By default, our system sends faxes at the standard fax resolution of 204 x 98 DPI (dots per square inch), which is sufficient for most fax content. Our system also offers the option of sending faxes at high resolution- 204 x 196 DPI (dots per square inch); also known as "fine" resolution). Please note: Additional 25% per page charge applies for high resolution fax page sending.
- Tick "Use DNCR List Washing" if you need your fax lists washed against the Do Not Call Register.
- Sender ID. Optional, maximum 11 characters, no spaces or special characters. e.g : enter your business fax number
- Review the text between the "Send Scheduling" text box and "Send Now". If you are satisfied that your broadcast meets these requirements, click "Send Now". You will then be transferred to the "Current Active Faxes" queue. If you scheduled the campaign, it will show the date/time scheduled in the queue.
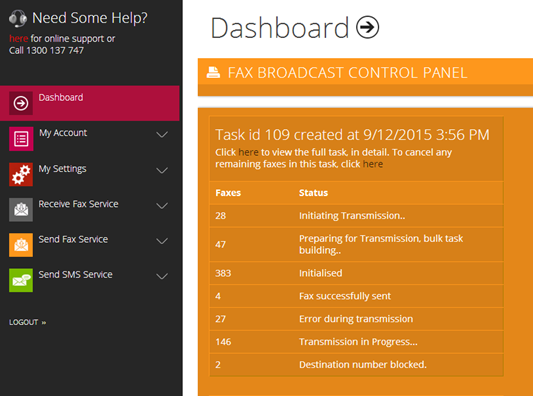
4. Monitoring